고정 헤더 영역
상세 컨텐츠
본문
✔️ 해당 글은 John Ahn님의 인프런강좌 "따라하며 배우는 리액트 A-Z"를 들으며 작성합니다.
이번 시간에는 React.memo와 useCallback을 이용한 렌더링 최적화에 대해 배우겠습니다.
필요한 경우가 아니라면 렌더링을 줄이는 것이 앱을 최적화하는 데 도움이 될 것입니다.
현재 총 4개의 컴포넌트들이 있고, 각 컴포넌트별로 console.log를 통해 언제 어떻게 렌더링되는 지 알아보겠습니다.
1️⃣ 언제 무엇이 어떻게 렌더링 되는지 알아보기
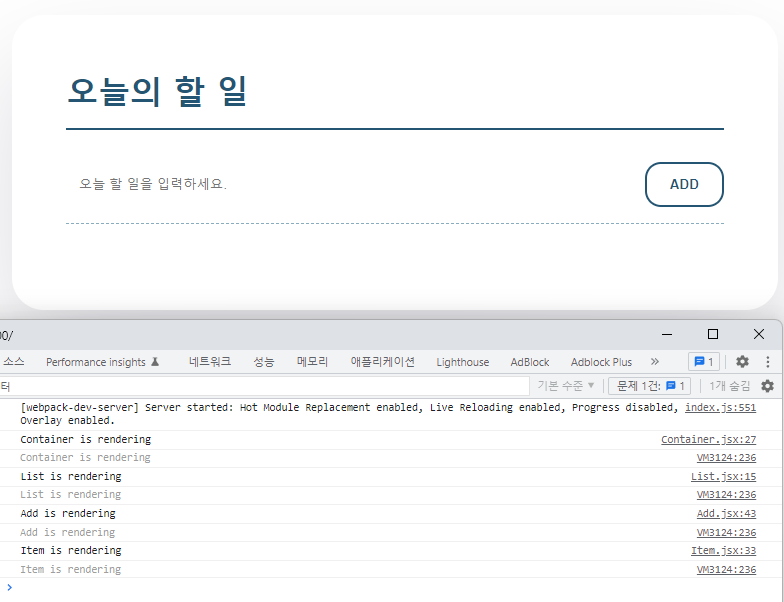
앱을 바로 켰을 때 Container, List, Add 그리고 Item 컴포넌트 모두 렌더링 된 것을 볼 수 있습니다.
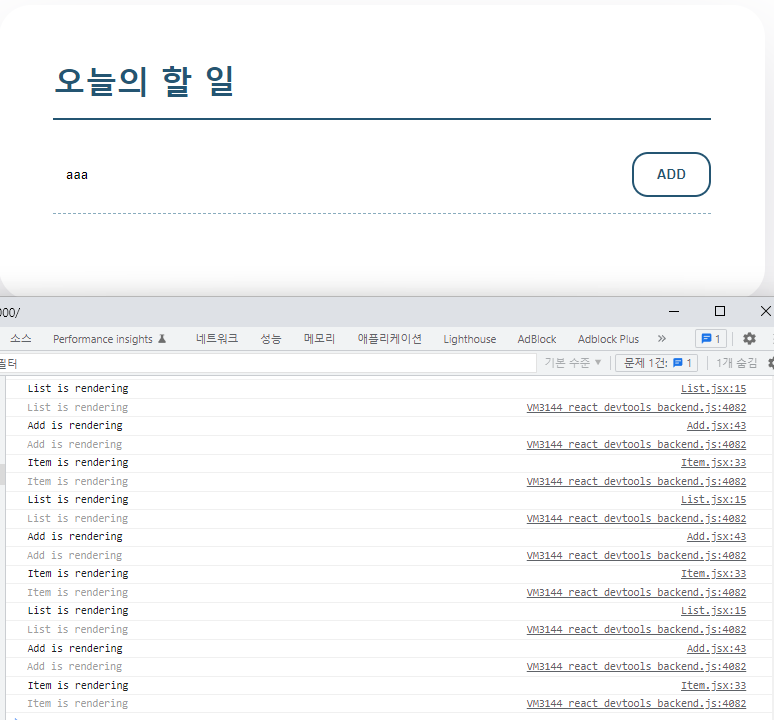
새로 할 일 아이템을 작성하는 input에 타이핑을 하면 그 input이 있는 Add컴포넌트가 렌더링 되는것을 볼 수 있습니다.
그런데 렌더링이 될 필요가 없는 List와 Item 컴포넌트 또한 덩달아 매번 렌더링되는 것을 볼 수 있습니다.
2️⃣ 컴포넌트 이식
기존에는 List컴포넌트 안에 Add와 Item이 있었는데,
Add를 Container안에 넣어주면서, 필요한 useState와 함수들을 같이 옮겨줍니다.
하는김에 자잘한 css도 조금 손봅니다.
const Container = () => {
  console.log("Container is rendering");

  const [todoData, setTodoData] = useState([]);
  const [value, setValue] = useState("");

  const handleClick = (id) => {
    let newTodoData = todoData.filter((item) => item.id !== id);
    setTodoData(newTodoData);
  };

  const handleChange = (e) => {
    setValue(e.target.value);
  };

  const handleSubmit = (e) => {
    e.preventDefault();

    let newItem = {
      id: Date.now(),
      title: value,
      completed: false,
    };

    setTodoData((prev) => [...prev, newItem]);
    setValue("");
  };
  return (
    <WrapContainer>
      <WrapTodo>
        <Title>오늘의 할 일</Title>
        <Add
          value={value}
          setValue={setValue}
          handleChange={handleChange}
          handleSubmit={handleSubmit}
        />
        <List
          todoData={todoData}
          setTodoData={setTodoData}
          handleClick={handleClick}
        />
      </WrapTodo>
    </WrapContainer>
  );
};
3️⃣ React.memo 작성
Add 컴포넌트의 input을 작성하는 동안 굳이 리렌더링 될 필요 없는 List와 Item 컴포넌트를 React.memo로 감싸줍니다.
const List = React.memo(({ todoData, setTodoData, handleClick }) => {
  console.log("List is rendering");

  return (
    <WrapList>
      <Item
        todoData={todoData}
        setTodoData={setTodoData}
        handleClick={handleClick}
      />
    </WrapList>
  );
});
const Item = React.memo(({ todoData, setTodoData, handleClick, newItem }) => {
console.log("Item is rendering");
const getStyled = (completed) => {
return {
textDecoration: completed ? "line-through" : "none",
color: completed ? "#89acbe" : "#0c1214",
};
};
const handleCompledteChange = (id) => {
let newTodoData = todoData.map((item) => {
if (item.id === id) {
item.completed = !item.completed;
}
return item;
});
setTodoData(newTodoData);
};
return (
<>
{todoData.map((item) => (
<WrapItem key={item.id}>
<ItemLabel style={getStyled(item.completed)} key={item.id}>
<Checkbox
type="checkbox"
defaultChecked={false}
onChange={() => handleCompledteChange(item.id)}
/>
{item.title}
</ItemLabel>
<BtnDelete onClick={() => handleClick(item.id)}>X</BtnDelete>
</WrapItem>
))}
</>
);
});4️⃣ useCallback 사용
React.memo로 감싸줘도 계속해서 List와 Item컴포넌트가 리렌더링되는데,
todoData와 setTodoData를 사용하는 handleClick함수의 영향을 받아서인 것 같습니다.
handleClick함수는 List 컴포넌트 안에 있는 Item컴포넌트에서 사용됩니다.
useCallback으로 함수를 감싸주고, 디펜던시인 [todoData]를 넣어 todoData가 바뀔때만 함수가 작동하도록 만들어줍니다.
  const handleClick = useCallback(
    (id) => {
      let newTodoData = todoData.filter((item) => item.id !== id);
      setTodoData(newTodoData);
    },
    [todoData]
  );
🖥️ 결과물
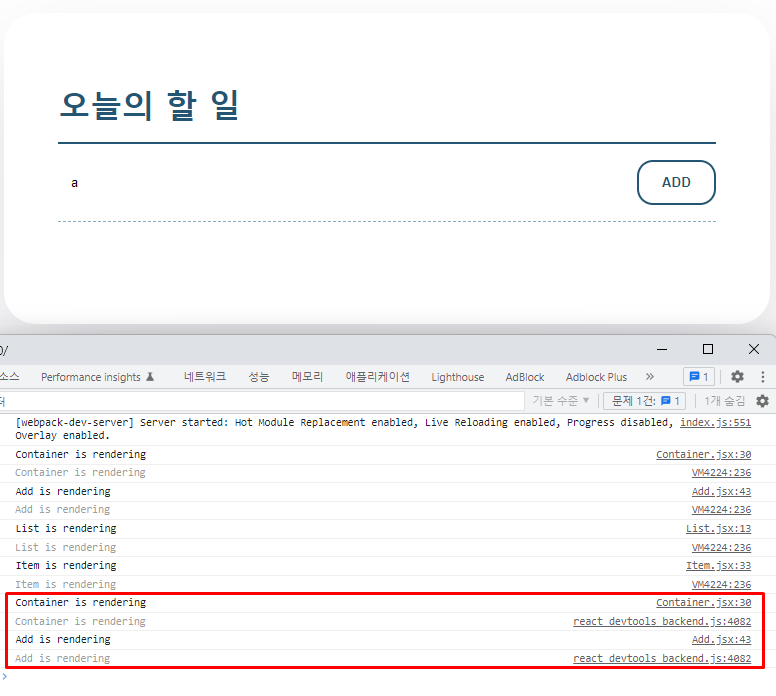
최초에 앱이 렌더링 되었을 때를 제외하고,
Add 컴포넌트 내 input에 변화를 줬을 때 마땅히 렌더링되어야하는 Container와 Add만 리렌더링되고,
불필요한 List와 Item은 리렌더링되지 않습니다.
'Study with me' 카테고리의 다른 글
| Todo List 만들기로 배우는 React(feat.Styled component in emotion) - 7 (0) | 2022.09.07 |
|---|---|
| Todo List 만들기로 배우는 React(feat.Styled component in emotion) - 6 (0) | 2022.09.07 |
| Todo List 만들기로 배우는 React(feat.Styled component in emotion) - 4 (0) | 2022.09.06 |
| Todo List 만들기로 배우는 React(feat.Styled component in emotion) - 3 (0) | 2022.09.06 |
| Todo List 만들기로 배우는 React(feat.Styled component in emotion) - 2 (0) | 2022.09.06 |


